BLUE LED voltage step-up.

Some of the new high-bright LEDs needs a slightly higher voltage than the traditional LEDs.

Using a small-signal transistor as a sort of relay, it is very simple and easy to use the old LED signal to turn the new bright LEDs On/Off.
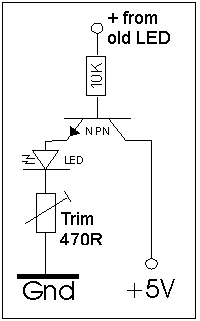
This is a diagram of such an electronic switch. It should cost you no more than US$1-2 for all the parts.

The trim pot. can be 470 ohm.

The 10K ohm resistor is to protect the transistor.


Regular LEDs use 2.2 to 2.4 volt, where as some of  the brighter LEDs needs 2.6 to 3.2 Volt to work. (See tables below)

With the use of a transistor and two resistors, one can make a low power switch that is controlled by the power from the old green LED, and it will supply enough voltage to make the new flashier LED work.

The transistor can basically be any small-signal NPN transistor, capable of running minimum 25mA

For odds and ends I use these two kinds; the BC547 runs a max of 100mA, the BC639 runs a max of 500mA.

Unless specifically noted otherwise, LEDs should not be run higher than 20mA
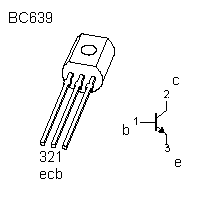

max 500mA, 80V


max 100mA, 45V

 Notice how the pins come in different order "ecb" and "cbe" .
     

If you want a more precise value of the trim potentiometer then you need to decide how many milli amps (mA) you want going through the led, and then do a simple calculation.

The transistor uses 1.2 Volt, this leaves 3.8V between the LED and the Trim.


Ohm's law

The tables below show how many milliAmps you get by applying a certain voltage over the different kinds of LED.

If we thoose the Bright Blue LED as our example, and we want 3.3mA worth of light. It needs 2.8V, leaving 1V for the Trim. 

From Ohms Law U=R*I  and  R=U/I we find:
1V/3.3mA = 1/0.0033 = 303 Ohm

In other words the Trim Resistor Ohm is found by applying this formula:
(SupplyVoltage-(1.2+voltage over LED))/mA in LED = T.ohm

I have calculated the Ohms needed for each of the measurements in the tables below, so you can see for your self, the interval you need for the Trim resistor, or a standard resistor. Again the recommended current for a LED is 20mA

Below are the results of some measurements I made, on the different LED I had in my drawer. 

The column 5V has the Ohm value if you just have a LED and a resistor between GND and 5V

The column 12V has the Ohm value if you just have a LED and a resistorbetween GND and 12V

Regular LED

T.ohm

5V

12V

1.86V

3.2mA

Start to see the light

606  981 3.169
1.92V 5.0mA Okay Light 376 616 2.016
2.0V 10.0mA  Nice light 180  300 1.000
2.28V 21.0mA Good Light 72  130 463
2.67V 50mA Not any brighter 23  47 187
3.0V 68mA Burning too hot, light is going down 12  29 132
Bright Blue LED

T.ohm

5V

12V

2.44V 0.2mA

Start to see the light

6.8k  12.8k 47.8k
2.53V 0.5mA Okay Light 2.540  4.940 18.940
2.63V 1.3mA Plenty of light 900  1.823 7.208
2.80V 3.3mA Lots of light 303  667 2.788
2.91V 5.0mA pain distance 1-2 feet 178  418 1.818
3.12V 10mA pain distance 7-8 feet 68  188 888
3.4V 20mA pain distance >10 feet 20  80 430
     Bright White LED

T.ohm

5V

12V

2.6V 0.2mA

Start to see the light

6k  12k 47k
2.81V 1.8mA Okay Light 550  1.217 5.106
2.91V 3.0mA Plenty of light 297  697 3.030
2.99V 5.0mA Lots of light 162  402 1.802
3.12V 7.5mA pain distance 1-2 feet 91  251 1.184
3.28V 12.5mA pain distance 6-7 feet 42  138 698
3.52V 20mA pain distance >9 feet 14  74 424
Bright Red LED

T.ohm

5V

12V

1.54V 0.4mA

Start to see the light

5.650  8.650 26.150
1.67V 2.0mA Okay Light 1.065  1.665 5.165
1.76V 3.8mA Plenty of light 537  853 2.695
1.85V 6.4mA Lots of light 305  492 1.586
2.00V 12.0mA pain distance 1-2 feet 150  250 833
2.20V 20mA pain distance 3-4 feet 80  140 490
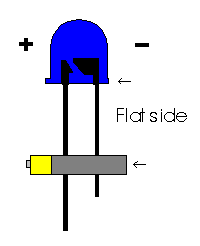
This illustrates what is the positive and the negative side of a LED.

I remember it by thinking of the flat side of a battery, as it has the same value as the flat side of a LED.